
Easy Royal Icing
This easy royal icing recipe is the key to turning simple cookies into edible works of art. The good news? It’s much easier to make than you might think!
This royal icing recipe is perfect for beginners and seasoned bakers alike. With just a few simple ingredients, you’ll have an icing that dries beautifully and holds its shape.

It’s ideal for all those fun and festive designs you’ve been dreaming about.
Grab your favorite cookie cutters and let’s dive into the world of cookie decorating—because delicious creativity starts here!
Need some cookies to decorate? Check out these great recipes for gingerbread cookies and sugar cookies!
Why you’ll love this easy royal icing
If you’re looking for a foolproof royal icing recipe that’s versatile and reliable, you’re in the right place! Whether you’re decorating cookies for the holidays or adding a special touch to birthday treats, this recipe will make your decorating process a breeze. Here are three reasons why you’ll love it:
Simple Ingredients – You only need a few simple ingredients: powdered sugar, meringue powder, and lemon juice.
The perfect consistency – Whether you need thick icing for detailed piping or something thinner for flooding cookies, this recipe is easy to adjust to fit your decorating needs.
Dries beautifully – It sets with a smooth finish that holds its shape perfectly, making your cookies look like they came straight from a bakery.
Get ready to create stunning cookie designs with minimal effort and maximum results!
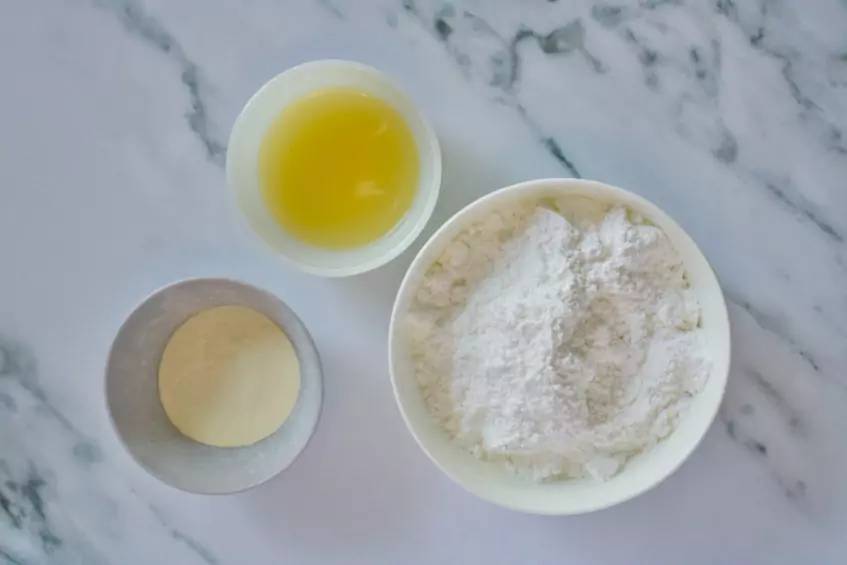
Icing ingredients and some notes
When it comes to making royal icing, the ingredients are simple but work together perfectly to create a smooth finish that sets perfectly.
Let’s break down what you need and why each ingredient plays an important role:
- Bottled lemon juice (not fresh) – Bottled lemon juice provides a consistent level of acidity that helps stabilize the icing and brighten the flavor. Fresh lemon juice can vary in acidity and might affect the texture, so bottled is the way to go here.
- Powdered sugar – This is the foundation of royal icing, providing sweetness and structure. Its fine texture ensures a smooth and lump-free finish, making it easy to pipe and spread.
- Meringue powder – Meringue powder is the magic behind royal icing’s ability to harden. It replaces raw egg whites, making the icing safe to eat and easy to work with. Plus, it’s convenient and shelf-stable.
- Gel food coloring (optional) – If you want to color your icing, gel food coloring works the best. It makes vibrant colors without thinning out the icing.
These simple ingredients come together to make a royal icing that’s reliable, easy to use, and delicious. Whether you’re decorating cookies or creating intricate designs, this icing will deliver every time.
How to make royal icing
Royal icing may sound fancy, but it’s surprisingly simple to make! This icing is perfect for decorating sugar cookies. With just a few ingredients and a little mixing, you’ll have an icing that sets beautifully.
Follow these step-by-step instructions to whip up your own royal icing:
- Whisk. In a large mixing bowl, whisk together the meringue powder and the bottled lemon juice. Whisk for about 1 – 2 minutes, when the powder is dissolved and it’s bubbly on the surface.
- Mix. Add the powdered sugar and salt. Mix until smooth.
- Consistency. Drag the spatula through the icing and count how long it takes for the icing to come back together and be smooth again. A very versatile consistency is a 20 second consistency, meaning it takes about 20 seconds for it to come back together.
- Color. Separate the icing into separate bowls. Add gel food coloring to the icing and mix until colored throughout.
- Decorate. Place the royal icing into piping bags and get decorating!
With these simple steps, your royal icing will be ready to transform your sugar cookies into edible works of art!

Prep tips
Getting your royal icing just right doesn’t have to be tricky. With a little preparation and attention to detail, you can whip up icing that’s smooth, glossy, and easy to work with.
Here are a few tips to set you up for success:
- Use fresh ingredients. The quality of your ingredients matters! Make sure your powdered sugar is fresh and free of clumps. For optimal results, double-check that your meringue powder hasn’t expired.
- Adjust consistency gradually. Royal icing consistency can change very easily with the addition of liquid. So, if you need to thin out your icing, add liquid a little at a time.
- Color. Use gel food coloring for vibrant colors without altering the consistency of your icing. Add coloring a drop at a time and stir thoroughly—colors often deepen as the icing sits.
With these simple tips, you’ll be on your way to creating royal icing that’s as fun to work with as it is beautiful on your cookies!
How to store royal icing
Once you’ve whipped up a batch of royal icing, storing it correctly is key to keeping it from crusting over.
Whether you’re taking a short break or planning to save it for later, these tips will help you store your icing like a pro.
- While decorating. If you’re decorating cookies over several hours, keep your icing covered while you work. You can store it in a piping bag with a rubber band sealing the top or in a bowl covered tightly with plastic wrap.
- Short term storage. Transfer your royal icing into an airtight container as soon as you’re done making it. Exposure to air causes the icing to dry out and form a crust. In an airtight container, you can leave it on the kitchen counter for up to 2 days.
- Longer term storage. Again, put the icing in an airtight container. Royal icing can be stored in the refrigerator for up to a week. When you’re ready to use it again, let the icing come to room temperature and give it a good stir to give it a smooth consistency again.
By following these tips, your royal icing will stay fresh, smooth, and perfect for creating beautiful designs.

Conclusion
And there you have it! A simple, versatile, and easy royal icing recipe that’s perfect for decorating cookies.
This icing is perfect for creating beautiful designs with minimal effort.
Don’t forget to get creative with colors and designs—this is where the fun begins!
And if you’ve got leftover icing, store it in an airtight container and give it a good stir before using it again.

Easy Royal Icing
December 12, 2024Equipment
- Large mixing bowl
- Whisk
- Electric hand mixer
Ingredients
- ¼ cup bottled lemon juice (58 g)
- 2½ TBS meringue powder (22 g)
- ½ lb powdered sugar (227 g)
- gel food coloring
Instructions
- In a large mixing bowl, whisk together the meringue powder and the bottled lemon juice vigorously for about 1 – 2 minutes. Stop when the meringue powder is completely dissolved and there's a layer of large, foamy bubbles on the surface.¼ cup bottled lemon juice, 2½ TBS meringue powder
- Add the powdered sugar. Using an electric hand mixer, mix on medium speed for about 2 minutes. The icing should be smooth and shiny. Be careful not to overmix, or you'll add too much air to the icing and it won't dry right.½ lb powdered sugar
- Drag a spoon through the icing and count how long it takes for the icing to come back together and be smooth again.This recipe makes about a 20-second consistency, meaning it takes about 20 seconds for it to come back together. This consistency is versatile and works for both outlining and flooding.Mix in lemon juice or water, drip by drip, to thin the icing out if needed.
- Color the icing (optional): Separate the icing into bowls. Add gel food coloring to the icing and mix until colored throughout.gel food coloring
- Transfer icing to piping bags and start to decorate your cookies.
- Store in an airtight container on the counter for up to 2 days, or in the fridge for up to a week. Stir well before using.

One Comment
Comments are closed.